Deex VRay Arsenal, a small tool that saves a lot of time (English Traduction)
jeudi 7 février 2013 à 10:03 It's been a while since I heard Damien (aka Deex) talk about his tool. I even had the opportunity to be on the same production when he thought the main line. When he told me that his tool was finally done, I could not help but ask him a license to test it out.
The idea of this post is to present the main features of Arsenal. You will see that despite an approach that may seem a little too user friendly, this tool is a true production tool that make the job quite easier.
Let's go! 
Notice: Before we start, I invite you to check Use V-Ray VFB in the VRay Common tab of the Render Settings panel:
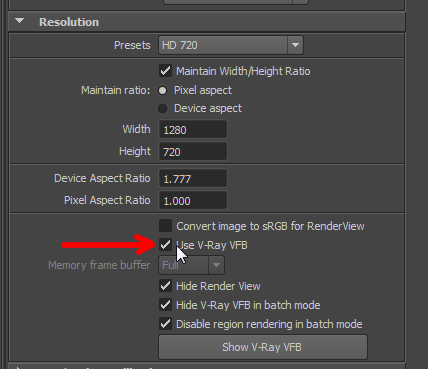
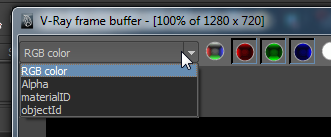
This will give you access to a kind of special VRay Render View that allows you (in addition to a lot of things) to directly visualize passes (top left).

Installation
I thought installation was "special" in some part. This is not what we are used to see in common scripts.
First, you must install PyQt which most of the time is not an easy task (especially on Windows). Fortunately, an "easy" installer is available on the website. It's pretty cool!
The tool installation has been, designed to simplify the production integration (using environment variables), but can be quite daunting for people who are not necessarily used to play with their Maya.env file. Especially since I'm sure he would have been possible to have a "old school" install (scripts in the script folder, the shelves in the shelves folder, etc ... ), but this wouldn't have been so clean and it would have been a bit more complicated to deal with every update then with the current way, you just need to replace one folder. 
The main window
When you launch it, you've got this:
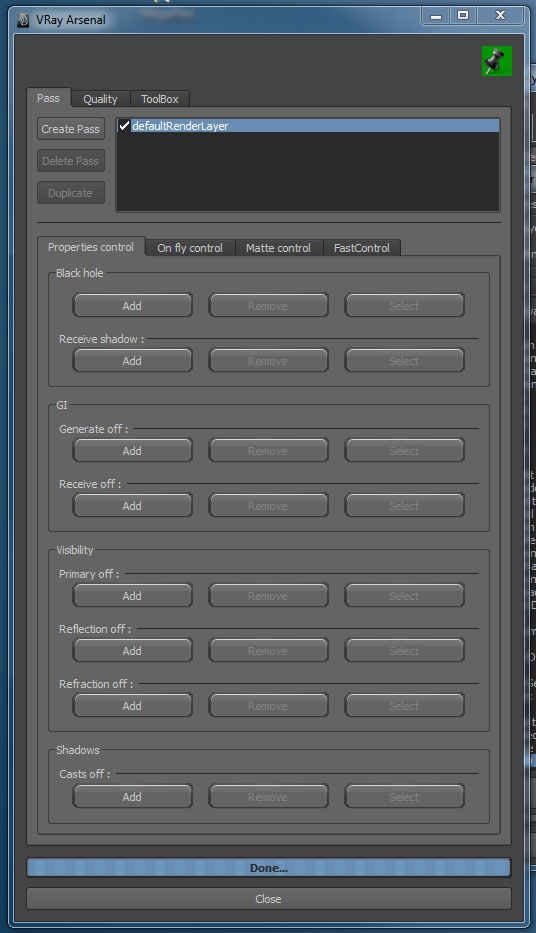
We will talk about tabs bellow.
There is a spin button. Once ticked, Arsenal will "stay at the top". Else, it behave like a Maya window.
There also is a close button at the bottom I would not insult you explain the purpose. 
There is three tabs we will see in the order:
- Pass, which regroup Maya Render Layers and the VRay pass system. Their both combined use is common.
- Quality, which is a very usefull feature: A slider, from 0 to 99 to increase or decrease render quality using a gradual modification of your render settings.
- ToolBox, which regroup a lot of tiny tools that save a lot of time.
L'onglet Pass
On the top part, it's just Maya Render Layer (unjustly named "Pass" in the three buttons on the left). Click on one of these Render Layer select it the same way Maya does. It's just a time saver. For renderers that don't need complex passes you should not need them.
Notice you can do a Set global to on directly on your RenderLayers from this window (see the Maya doc).
Let's go now through the most interesting part. 
Properties control
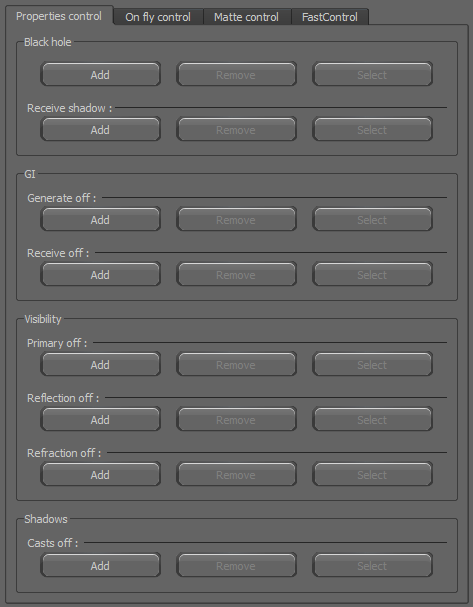
This system is extremly fast to prepare your passes.
It's quite (quite) simple:
- You select an object/group, you do a Add and presto!
- You want to remove an object/group? Remove!
- You want to see objets having a particular property? Select!
It's at once clear and also much faster than the "conventional" method aimed to manage these properties in grainy way on the groups/objects. Here, the system is reversed: You handle objects based on their property.
I find it much clearer. 
Here is an quick explaination of the differentes propertties. For more details, refer to the official documentation.
Black hole
Objects having this property will not be shown in the render (their will be black) and their alpha will be empty.
Receive shadow: Black hole objects having this property will recieve shadows and store it in their alpha (example: a ground).
GI
- Generate off: Object with this property will not be used during the global illumination step (exmple: separate GI between characters and the set).
- Receive off: Object with this property will not recieve any indirect illumination.
Visibility
- Primary off: Object with this property will not be visible in primary rays (their will be visible in reflections/refractions/GI).
- Reflection off: Object with this property will not be visible in reflection rays (can be used to provide complex object to be reflected if it doesn't bring something to the final render).
- Refraction off: Object with this property will not be visible in refraction rays.
Shadows
Cast off: Les objets ayant cette property ne projetteront pas d'ombres. Cast off: Object with this property will not project shadows.
On fly control
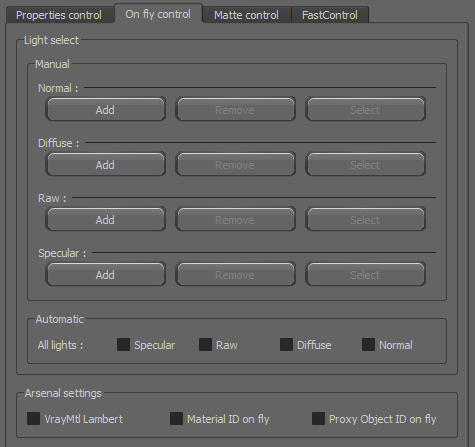
I'm not a big fan of terminologies used in this tab (even if it is VRay one). I'll try to be clear. 
Light select
Here we will try to render passes by light or for every lights. This passes will be named as nameOfYourLightShape_normal, nameOfYourLightShape_diffuse, etc...
- Manual: If you want to render "contributions" for given lights only, it is here that you will.
- Normal: And this is where it lends quite confusing: Here, Normal is not the normal from a vector direction sense but normal within the meaning "classic". It is therefore a pass containing all the direct illumination of one light. That's all. Note that this is the terminology used in VRay...
- Diffuse: A direct lighting Pass of a light, with only diffuse informations.
- Raw: A pass that contain "raw" direct lighting informations of the light.
- Specular: A specular pass of the given light.
- Automatic: Say that if you intend to render all the passes for all lights in the scene, go directly there. You can also combine Automatic mode for a specific pass with Manual mode for another specific pass.
- Specular: Render all specular passes for every light in the scene.
- Raw: Same as Specular but for the Raw.
- Diffuse: Same but for the Diffuse pass.
- Normal: Same but for the Normal pass.
Arsenal settings
Here are my favorite options. Even if you can't really guess what they are at first. 
- VrayMtl Lambert: Tick this case will transform to VrayMtl Lambert, on the fly and during the render, every materials of your scene, which is really usefull to check your global lighting. The point where this way differ from the material override with RenderLayer, it's materials will still have their displacement/bump/normal if their have one.
- Material ID on fly: Tick this case will generate Material ID on the fly, when the render start, using material names (without namespaces) as "seed". So, you will always have the same Material ID color as your material has the same name. Of course, you must have a Material ID in your Render Element. Note this feature is compatible with VRayblendMaterial: If you blend many materials (with mask) in a VRayblendMaterial, each material will have it own ID in the pass.
- Proxy Objects ID on fly: Same as Material ID but this time with VRay proxy.
Matte control
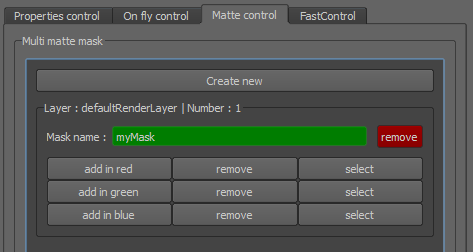
This one I also love it as it's simple! 
Principe is to generate "mask" passes. You know? RGB mask:
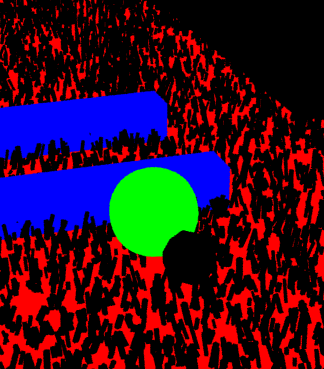
Roughly:
- You click Create new.
- You give a name to you mask pass (Mask name). If you don't give a name to your mask pass, it will be removed.

- You select a/some objects/groups.
- You click add in red (or green/blue).
- You render and you have you mask pass!
- You can do this again for another pass.
It's as simple I don't even know what to add! 
Oh yes! This system bypasses a VRay limitation. Example:
- You have a object_A with ID 1.
- A object_D with ID 2.
- This two objects are in a group with ID 3.
- Create a Multi Matte Render Element and set Red object ID to 3.
- Render and look at your multimatte pass.
It is black! Why? Because as VRay notice objects in group have an object ID, it doesn't show them in the pass.
With the Arsenal system, if you want to have a red group, it will be red!
FastControl
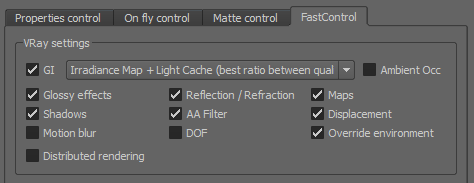
This tab just gather main VRay options to quickly activate/desactivate them.
Quality tab
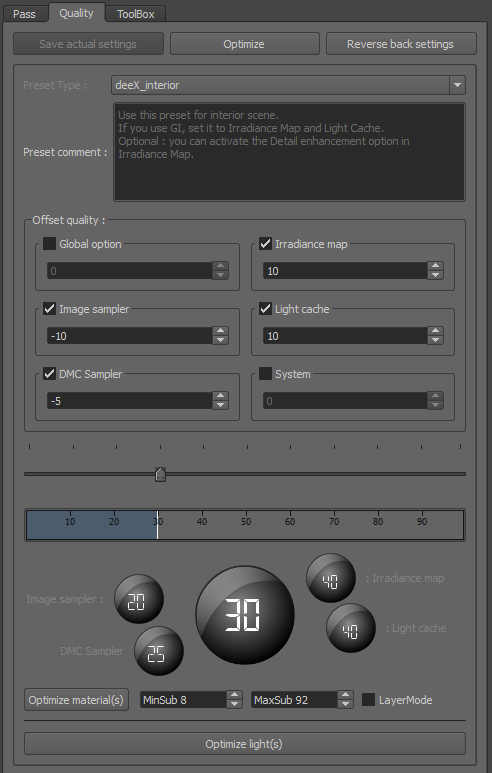
Here we are in the area that peoples who are not really render guru should enjoy. And yet, you will see it can definitely pleased peoples who are used to change their settings manually. 
The first thing to do to activate all of this is to click on Save actual settings which will save your current settings, and on Optimize to setup different expressions. From this point, you can start to change the main slider to vary render quality.
Preset Type
Preset Type are more about slider configuration than "preset". There is two Preset Type:
- deeX_interior
- deeX_exterior
This two choices represent a majority of lighting case.
Presets are simple texte file that can be found in:
C:\Users\Narann\Documents\maya\deeXVRayArsenal\2013\win64\scripts\presets
This files, with very simple syntax, are used to drive ranges (min and max) of VRay attributes which will be then modified by your slider. If I don't talk nonsense, the relationship between the slider and settings it drive is logarithmic to avoid settings burn render times when you start to increase too much the slider. 
If the opportunity to create it own presets will probably doesn't interest occasional lighters, being able to set these min and max parameters manually can be very interesting for VRay gurus having their little habits. 
Moreover, it would have been great to see this tool independent of VRay to drive, for example, Mental Ray. 
If you want to prevent Arsenal modifications on a specific attribute, just lock it.
Offset quality
Here we have a very good idea. Principe is to apply an offset to the slider for some parameters.
For example, my slider is suppose to be 50. I think sampling is a bit sensitive and increases the rendering time too quickly. However, I am satisfied with the rest... So, I just check the Image sampler then type -10 for the settings of the sampler applies as if my overall slider was 40! Brillant! 
Optimize material(s)
Another interesting idea: You determine two extrem subdivision values (sampling), click Optimize material(s) button and Arsenal will determine the value to use based on Glossiness value of the material. More it's gloss, more you need samples.
Notice the checkbox right to LayerMode. If you check it before clicking Optimize material(s) button and you are in a RenderLayer (other than masterLayer) attributes will changed only on the current RenderLayer.
Optimize light(s)
I'm not sure this button is very useful. For now it only set every VRayLights Subdiv parameter to 5...
ToolBox tab
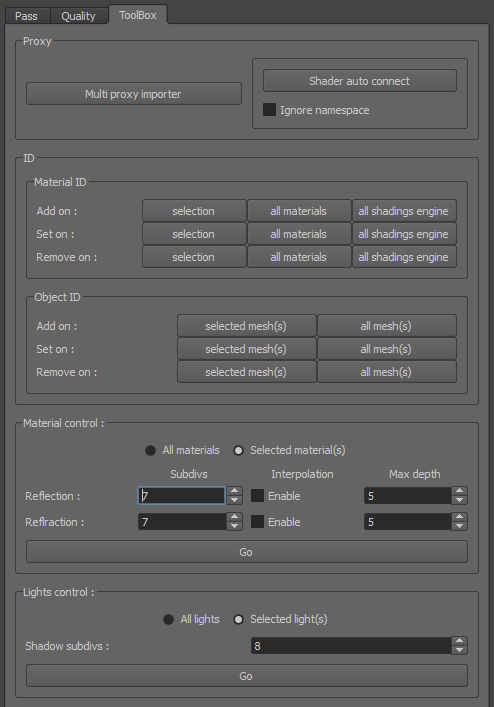
Here you will find small very specific tools.
Proxy
VRayProxy are a marvel. We used them on url=http://www.imdb.com/title/tt170...Day Of The Falcon/url to make horse animation cycles shifting speed.
Multi proxy importer
This button allows you to import multiple VRayProxy because, as surprising as it may seem, it is not possible to do this in standard... You need to import VRayProxy one by one...
Shader auto connect
When you export a VRayProxy, the "assignation slots" are created. Principle is to store, inside the proxy, shader assignations for reassign your shaders later.
Once VRayProxy reimported into your scene, you can apply a VRayMeshMaterial (FYI, it's already created when you import). This material will show different slots assignments for your proxy to connect your own shaders.
Shader auto connect button can automatically reconnect shaders based on their names, which avoids having to do it yourself. On proxy with tens or hundreds of assignments, it is rather convenient...
Ignore namespace
This box allows you to ignore shader namespaces of your scene when reassigning to the proxies. In principle, this allows you to have these shaders in external references (with a namespace) without have problems for reconnect using their names.
ID
Once again, here we have tools to quickly assign IDs to materials and objects.
Goal is then to release this IDs as passes to give to your compositing friends.
Material ID
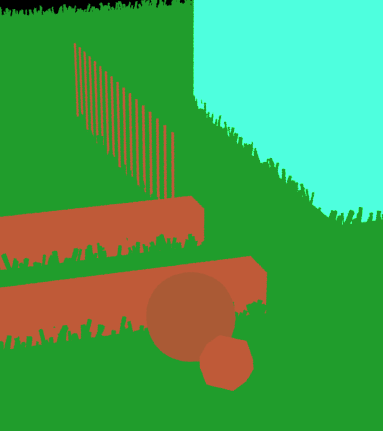
- Add on: Used to apply Material ID attributes to selected materials/all materials/all shading engine.
- Set on: Apply a unique ID to Material ID attributes for the selected materials/all materials/all shading engine. This number is generated randomly using the material name. This method has double side: If you change the name of the material them you click again on Set on, it ID color will change likewise. Notice Material ID on fly checkbox from Pass/On fly control do the same thing directly on the fly! :)
- Remove on: Supprime les attributs de Material ID des materials sélectionnés/tous les materials/tous les shading engine.
- Remove on: Remove Material ID attributes from selected materials/all materials/all shading engine.

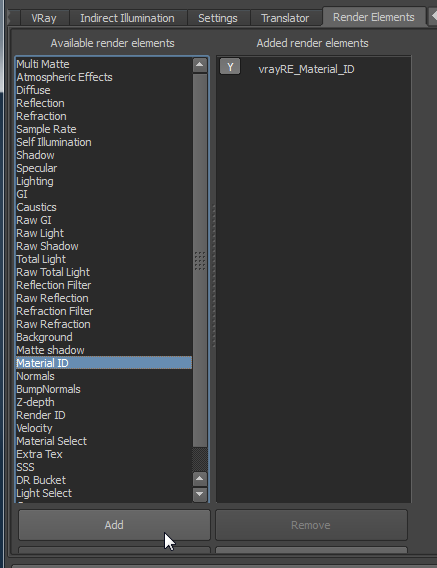
Last point, to make this work, don't forget to create a Material ID pass (Render Element):
Object ID
Same as Material ID but at the objects level.

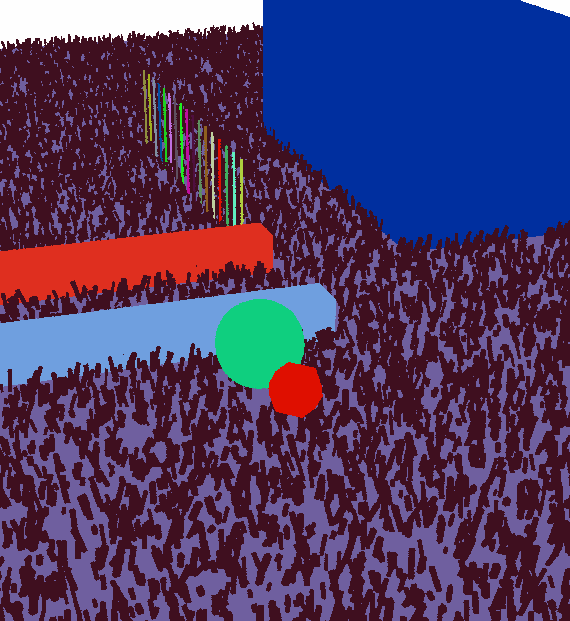
Each object will have a differente id.
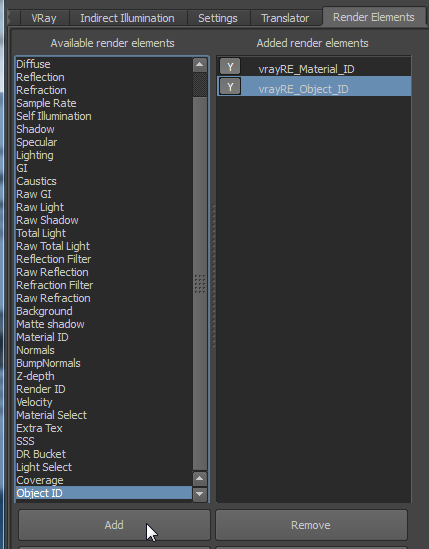
Once again, don't forget to create Object ID Render Element:
Material control
This part allows you to apply some key values on selected/all materials in one click.
- Reflection/Refraction Subdivs
- Reflection/Refraction Interpolation
- Reflection/Refraction Max depth
A Trace option (Reflection/Refraction) to completly activate/desactivate raytracing would be interesting here. 
Lights control
It can't be easier: Apply a Shadow subdivs value to selected/all lights of the scene in one click.
Techniquement, comment ça marche? How it work technically?
Hahaha! The particularity of this tool is to not change your scene when you generate passes (Except Maya RenderLayers of course), when you do some "On the fly" stuff or even Matte.
But then? How is it doing? 
Well, it uses a feature of VRay I'll dream of seeing widespread throughout render engines as it increase pipeline possibilities: The Python API VRay Scene Access.
I quote the documentation as it's very clear:
The V-Ray scene access python API allows you to modify the V-Ray scene after it is translated by the V-Ray for Maya translator, and before it is rendered and/or exported to a .vrscene file. The scene access API allows you to expand the V-Ray for Maya translator by providing custom translation for constructs that are not recognized by V-Ray, or for modifying the scene before rendering without changing the original Maya scene.
Boum! Chaos Group guys are genius! 
Roughly, it allow you to drive the renderer before (during?) the render. So we can imagine crazy stuff like generate scenes directly in VRay, on the fly, without using heavy vrscene file. For those who have worked with Renderman, it means no more generation of heavy RIBs you use only once. Here, you can control VRay using Python!
I asked for a similar feature on Nvidia ARC forum (formerly Mental Image) as I thought it was a great idea but I'm not sure it changes much. 
So, Damien's tool uses it, and that's what allows him to keep a clean Maya scene and be able to act directly at VRay level, before rendering.
Conclusion
For having test the thing thoroughly I can assure you it worth every penny (69€! :bravo:).
- Time saved preparing passes is terrible and you don't have to go through all the VRay menus.
- The ability to control objects according their properties is quite natural.
- RGB Mattes management is also easy.
- On the fly Material/Object ID working in few clicks... You have no more excuse for not using them.
- On the fly VRayMtlLambert deserves a section all by itself as it can be practical.
- Quality slider preset and offsets system can go far.
- Deex will continue to add stuff.
What is missing:
- Ability to export you "pass set" in a text file for later import (planned!).
- More On the fly options (I'm a big fan of this!)
- A Python API as easy to use than this buttons. Like arsenal.pass.propertiesControl.blackHole.add("myObject"). But except me, I'm not sure any one will find this useful...

OK, I sell a little completely the thing but yes: It's worth it! 
Beyond the fact that I invite you to jump into this tool, I hope that, if you already have it, this presentation/tutorial will allow you to go further! :)
See you!
